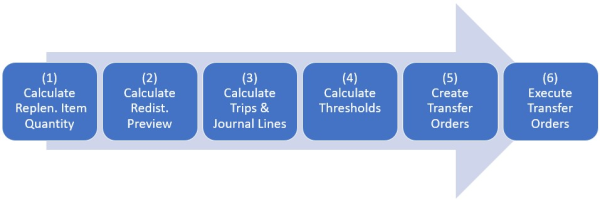
The complete Store Stock Redistribution process is done in the following steps:
The Redist. Preview calculation is based on a calculated Replenishment Item Quantity table. In a first step, the Redist. Demand and Redist. Stock is calculated for every item, variant, and location. This calculation uses the selected Redist. Calculation Type to determine Redist. Demand and Redist. Stock. Next, the result is saved in the Redistribution Stock Quantity (RSQ) table on item, variant, and location level. The Redist. Preview holds this information on item level, the Redist. Preview Line on item and variant level. Only locations that are set up in the Redist. Matrix are considered in the RSQ calculation.
To calculate the Redist. Preview
- Click the
 icon, enter Redistribution Replenishment Journal, and select the relevant link.
 - Click the Functions action, then click Add Items to Journal/Preview to open the Add Items to Redist. Journal report. The filters and some setup fields from the Replenishment Template will be shown in this report.
- Change filters or field values, if needed.
- Click OK to start the calculation.
For calculation types other than Manual Redistribution, if the field Create Journal Lines in the Replenishment Template is set to Create Redist. Preview Only, the report will only calculate the Preview and will not create Journal Lines. This lets you review the result before the Replen. Journal Lines are created. For more information see How to: Set Up Redistribution Templates .
To open and review the Redist. Preview
- When the Redist. Preview has been calculated successfully, click the Show Redist. Preview action in the Process group. This opens the Redistribution Journal Preview page.
Note: This page looks different for different Redist. Calculation Types. - To see detailed information on item and variant level, click the Show Variants action.
- To see detailed information on item, variant, and location level, click the Show Details action.
On this level you can see the detailed stock information and if the location is considered as a location with Redist. Stock or Redist. Demand. The Exclude field lets you exclude specific locations from the later trips calculation.
To manually adjust the Redist. Stock and Redist. Demand Quantities
- When the Redist. Preview has been calculated successfully, click the Show Redist. Preview action. This opens the Redistribution Journal Preview page.
- Select the relevant item, and click the Show Items Availability action. This opens the Retail Item Variant Availability by Location page.
For Redist. Calculation Type Manual Redistribution, View by Inventory (Transfer Quantity) is the only editable mode. For all other calculation types, the only editable mode is Eff. Inventory (Transfer Quantity). - Key in the desired quantity in the corresponding value cells, per item, variant, and location. The system auto-translates the input value into transfer quantity. The valid inputs are a whole number or a number with a plus (+) or minus (-) sign. For detailed instructions on how to manually create the transfer quantities, refer to Retail Item Variant Availability by Location.
- Key in the desired quantity in the corresponding value cells, per item, variant, and location. The system auto-translates the input value into transfer quantity. The valid inputs are a whole number or a number with a plus (+) or minus (-) sign. For detailed instructions on how to manually create the transfer quantities, refer to Retail Item Variant Availability by Location.
To exclude items or locations in the Redist. Preview
- When the Redist. Preview has been calculated successfully, click the Show Redist. Preview action. This opens the Redistribution Journal Preview page.
Note: This page looks different for different Redist. Calculation Types. - To exclude items manually from the later Trips calculation, select the Exclude field.
- To exclude multiple items from the later Trips calculation, click the Set Exclude (Item) action. When you click this action, all (filtered) items in the current page will be set to Excluded.
- To undo the exclude for multiple items, click the Remove Exclude (Item) action. When you click this action, all (filtered) items in the current page will be set to Included.
- The actions Set Exclude (Location) and Remove Exclude (Location) open a page where you can select the locations. Depending on the selected action, the locations will be set to excluded or included.
Note: The actions: Set Exclude (Location), Remove Exclude (Location) and Remove Exclude (All) are not available for Redist. Calculation Type Manual Redistribution.
See Also
Store Stock Redistribution Process